I have a QNAP TS-109 II Network Attached Storage (NAS) device which I use for data storage, download station, torrent client etc. This NAS is a Linux Box so I thought about using it for another application in addition to the other mentioned above: as an SSH tunneling box for encrypting traffic when I’m outside of the home (on an unsecured wi-fi hot spot for example). Since the NAS is already running an SSH deamon, you can enable it to work as an SSH tunneling server. Basically you can use PuTTY (SSH client) to create an SSH tunnel with the NAS using local port forwarding. PuTTY creates a local port on your PC (e.g 9999) which listens for connections and sends all traffic that is destined to this local port over to the remote NAS SSH server. This traffic is sent over the encrypted SSH tunnel between your PC and the remote NAS. At the NAS end, the traffic exits the NAS towards the Internet (TCP Forwarding must be enabled on the NAS). With that setup you essentially create a secure encrypted tunnel that can be used to access the internet securely when you are connected on a public wi-fi hot spot or even in a hotel room.
First, we need to make some changes on the sshd configuration of the NAS station. Open a CLI connection with the NAS (using telnet or ssh) and edit (using vi) the sshd_config file located under /etc/ssh/ path. You need to change the following settings in sshd_config:
- Uncomment the #AllowTcpForwarding no parameter (remove the # ) and change it to yes.
AllowTcpForwarding yes - Uncomment the #PermitTunnel no parameter (remove the # ) and change it to yes.
PermitTunnel yes
However, the changes above will not be permanent since the QNAP NAS device will change all configuration to default settings when rebooted. Therefore we need to somehow make the changes permanent. What we can do is the following:
- Copy the modified sshd_config file into a shared location on the NAS.
- Use the “autorun.sh” script to copy the modified sshd_config file from the shared location and overwrite the original sshd_config file located under /etc/ssh/
- Then restart the sshd deamon to take the new modified settings.
I have copied the modified sshd_config file under /share/HDA_DATA/
Now, in order to create the autorun.sh file, do the following:
# mount -t ext2 /dev/mtdblock5 /tmp/config
# vi /tmp/config/autorun.sh
Get into vi editor and enter the following lines:
cp /share/HDA_DATA/sshd_config /etc/ssh/
killall sshd
Save the file and make it executable.
# chmod +x /tmp/config/autorun.sh
# umount /tmp/config
That’s it for the NAS.
Now in order to create the ssh tunnel, we will use PuTTy as shown below:

Open up PuTTY and go to Tunnels. At Source Port enter a desired local port that will be listening on your local PC (e.g 8888). Select Dynamic and press Add.

As you can see above, port 8888 is created. This port will start listening on your local PC after you connect with SSH to the NAS.
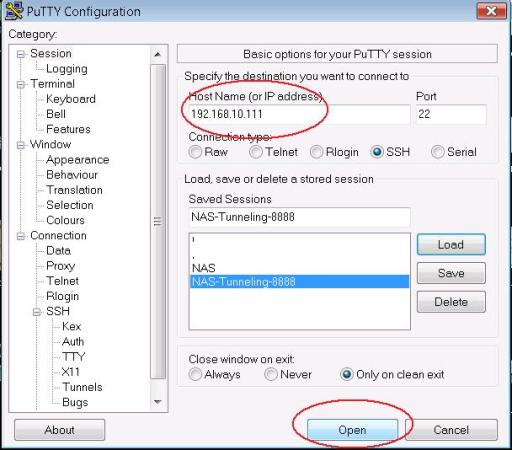
Now go up to “Session” and put the IP address of your NAS ssh server. The picture above shows a private IP address (192.168.10.111) but in real situations this should be the domain name or the public IP address of your NAS server. Click “Open” to log in to the NAS with your SSH username and password. When you log in, a secure SSH tunnel will be created between your PC and the remote NAS server.
If you need to encrypt all of your internet browsing traffic, you have to configure a SOCKS proxy on your browser with IP address 127.0.0.1 and port 8888.
First, thanks for a nice guide. The only thing is I can’t mount /dev/mtdblock5:
[/etc/ssh] # mount -t ext2 /dev/mtdblock5 /tmp/config
mount: /dev/mtdblock5 is not a valid block device
I have QNAP 439 Pro. Do you have any idea how can I find the correct place for autoexec.sh?
Thanks.
Hello Alexey,
Check under /dev/ directory to see if the name for the block device is different. It might not be exactly mtdblock5 but maybe something else. Do an “ls” under /dev/ and let me know.
Alexey,
the config ramblock for a 439 is /dev/sdx6
See this page at the QNAP wiki for more info
http://wiki.qnap.com/wiki/Running_Your_Own_Application_at_Startup
One thing I would recommend to your readers is to upgrade the SSH to OpenSSH, and then your tunneling procedure becomes easier.
http://wiki.qnap.com/wiki/How_To_Replace_SSH_Daemon_With_OpenSSH
dragon,
Thanks for the heads up. Appreciate it.
Can I install SSH to TS-101, Thanks
Jim,
SSH is already installed on TS-101. Remember that it is a Linux box, so you have SSH preinstalled.
@ BlogAdmin: Yes, ssh is preinstalled, but it is a proprietary version which only allows admin to login. The only way around this is with some hacks. The install of OpenSSH allows you to add users for remote login…you cannot currently do this using QNAP’s preinstalled ssh.
ok cool. I didn’t try it with a different user to be honest (just with admin). Thanks for your feedback.
Harris
How to forward udp packets from tunnel to eth0 in the pc?
Please help me to resolve this issue.
Thanks
Sathish
How to forward the packets from tunnel to eth1 in PC?
please help me resolve this issue.
Thanks
sathish
The application must be able to send the packets to localhost at the port you specified in the SSH tunneling. For example, the browser (application) is able to send the packets to localhost via its proxy feature.
Work but not work. My local computer tunneling work, putty log says tunneling is ok. Also I can access my Qnap 451+ using terminal (putty). But, 2016-07-04 15:32:57 Forwarded connection refused by server: Connect failed [Connection refused]. So, Qnap reject my connection.
Is it some way? Eg. how I can remove all protections of the Qnap 451+? Or is it some way solve this problem? It really looks problem is inside qnap, not local.
On firmware 4.2.2 for a TS-453A this method worked fine. But with the latest firmware, 4.2.3, this method isn’t working for me. Have you run into any problems with the latest firmwares?
Hello,
Thanks for your comment. Unfortunately I have not tested this on latest firmware so I don’t have an answer. What kind of problems are you facing with the new firmware?
I receive the following:
Open failure reason: AdministrativelyProhibited, description: open failed.
Something seems to be blocking the forwarding.
I’m also having a port forwarding issues with the latest firmware on one of my QNAP NAS. I sent a mail to their support team last night saying the following:
“After upgrading HS-210 to 4.2.3 on 21st January, I can no longer RDP over an SSH tunnel.
As a test, I can still RDP over an SSH tunnel on my older TS-109 II”
I’m waiting for a reply, but I did notice that AllowTcpForwarding had been set to no at the bottom of my /etc/ssh/sshd_config file. This looks like an extremely likely cause of the problem.
Yes definitely you should change “AllowTcpForwarding” to yes in the ssh config file.
Hi fellow QNAP NAS users. I have some good news to report back on this post.
I had a response from QNAP support asking for various dumps and logs. I never actually supplied these but suggested to them that I felt the “AllowTcpForward” should be set to yes. Btw, I must mention that I had attempted to set this to “yes” in /etc/ssh/sshd_config by editing the file. This file is NOT being read by the SSH daemon at startup because I can see the parameter is set to “yes” but clearly it’s isn’t working.
So the good news. Their support suggested that I run the following command
setcfg LOGIN “SSH AllowTcpForwarding” TRUE
and then reboot the NAS. After doing this, I could again RDP via an SSH tunnel through the NAS !!
That setcfg command must permanently alter the SSH parameter to be persistent over reboots.
I have asked their QNAP support if the next release of firmware will revert the “AllowTcpForwarding” parameter back to yes, and I am waiting on their response. I’ll post in here what they say.
Anyway – I hope this helps out anybody else who has found themselves in the same boat that I was in after upgrading their NAS to firmware 4.2.3 and not being able to tunnel ports through SSH.
Thanks a lot Adam for your valuable feedback. I’m sure many people will find the command suggested by QNAP very helpful.
Harris
Thanks A Goldsmith! I’ll give that a try.
Your response from QNAP was a lot better than mine. I got the following response:
“Hello,
Actually we don’t support and troubleshoot this kind of errors and issues, and unfortunately there is no instruction for this .
you need to search online and find in case there is any information.
Thanks for your understanding .”
JQnap – that’s an awful response! I hope this command fixes your particular problem.
I got a response back regarding the next releases of firmware
Your Query: Will the next firmware release revert this, or will I need to perform this command again after the next upgrade?
Ans: Actually they removed this feature due to some security reasons. You have to do the same on next firmware update also. Just FYI. Thanks!
So there you have it – keep that command to hand for every time you want to do port tunnelling through SSH after a firmware update!
The setcfg command worked for my situation, to allow for forwarding and tunneling:
setcfg LOGIN “SSH AllowTcpForwarding” TRUE
setcfg LOGIN “SSH PermitTunnel” TRUE
Then rebooted and everything is working.
Thanks again!
QNAP moved the config file to /etc/config/ssh